The King and I 7b+
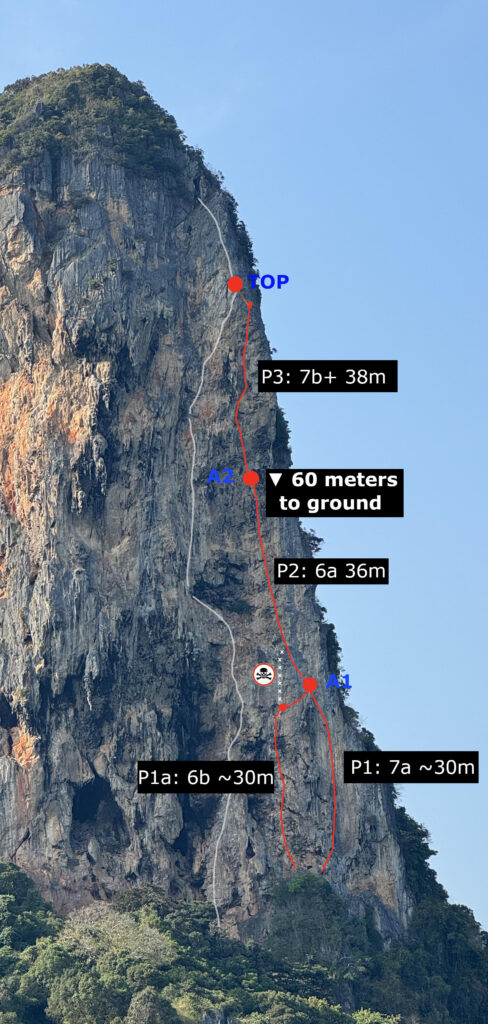
The King and I” is a route that, due to its “one of the most beautiful 6a pitches” and a quite challenging final pitch rated at 7b+, is somewhat rarely tackled in full and mostly by the connoisseurs. The exact line of this route isn’t entirely straightforward either. There are two versions of this climb. One kicks off following “The Suggard Prince” (6b) and the other begins with “The King and I’s” first pitch (7a). My working theory is that since the goal for many climbers was the second pitch of The King and I, a.k.a. the “most beautiful 6a in Tonsai”, and the original, starting pitch rated 7a felt too hard for many, over time the starting point shifted from the beefy 7a to the more manageable “The Suggard Prince” (6b). But that’s just my take.
Here’s the breakdown of both variations:
Pitch 1 (7a): – The first pitch starts at the same spot as “Fit to Be Thaid” 6a, but where “Fit to Be Thaid” veers right, “The King and I” goes straight up. The route initially follows good holds. As you gain height, the challenges increase.
Pitch 1a “The Suggard Prince” (6b): An alternative, and probably not entirely kosher, start to this line. “The Suggard Prince” is a slightly overhang route on solid holds, mostly protected by slings alone. Opting for this start, you need to make sure to reach the belay station, which is the finish of the original first pitch of The King and I (7a). This means, after getting to the obvious ledge at the end of “The Suggard Prince”, you shouldn’t continue straight up (the bolt protecting the exit move straight up doesn’t seem to be titanium), but rather traverse right and top out on the tufa where the belay for the second pitch of The King and I is situated.
Pitch 2 (6a): – “The most beautiful 6a on Tonsai”. Gorgeous, technical climbing over a 35+ meter stretch. The pitch ends in a cave under an overhang.
Pitch 3 (7b+): – The business starts right after the first clip. After tackling a bouldery problem, the route gives a bit of a breather before hitting the crux – a long, endurance-intensive sequence. For sending this pitch, I recommend a cool/windy day – the route has some slopy holds that are difficult to cling to in high temperatures. After the fifth clip, the route eases off to the anchor. There are remnants of an original anchor station at the top but it is advisable to climb a bit further to the left (3-4m) to get to the anchor of The Lord of the Thais. The first 5-6 clips of the pitch are over some seriously overhand terrain, any fall by the second climber means dangling in the mid air with no access to the wall. It is totally necessary to carry equipment suitable for prusiking or ascending the rope. Been there, tested that myself. :)
Access
Similar to “Lord of the Thais”, “The King and I” is located on the Thaiwand Wall, so the approach to the base of the cliff is similar to that for “Lord of the Thais”. Accessing the actual route requires reaching the starting point of “Lord of the Thais” and then climbing up to a higher platform located to the right of “Lord of the Thais'” start (see the diagram in the description of “Lord of The Thais”). There used to be a ladder here, but since Google marked the platform as a great viewing point, it attracted a large influx of tourists, and the ladder was removed. Now, one must climb up the 4th class terrain (with or without protection) to reach the top. Variant 1a (6b) is located a few meters to the right (look for draws), and the starting variant for 7a is a bit further, beyond a bend.
Timing and planning
Similar to “Lord of the Thais,” the route is practically in the shade all day, so the sun doesn’t significantly affect climbing plans. However, it’s worth considering that the 7b+ pitch might pose some challenges and unpredictably impact climbing time. As I mentioned earlier, this could be due to a potential fall by the second climber, but also descending from the top of the route (TOP) to A2 is not easy and can take a lot of time.
Gear
For climbing, we used standard equipment for sport multi-pitch routes consisting of, in addition to belay devices, a few screw-lock carabiners, a few slings, and prusiks, along with about 16 quickdraws. The choice of ropes turned out to be very important. We used 2 ropes. For belaying, we used an 80m rope and, in addition, we carried a 60m rope with us for the descent.
Rope Management
The route can be safely climbed only if you have at least one 80m rope – since the pitch after 7b+ is 38m, climbing with a shorter rope, though theoretically possible, is asking for trouble (e.g., if you need to lower the first climber on the longest pitch, there might not be enough rope).
In theory, the route can be completed using just one 80m rope. However, descending from the 7b+ pitch (TOP -> A2) would definitely be a significant challenge – especially in the lower part where the pitch is heavily overhung – back-clipping, if at all possible, would require a lot of effort.A much better solution in the case of only one 80m rope is to reach the TOP of The King and I, then climb the 6b pitch of Lord of the Thais and descend as in the case of Lord of the Thais.
Generally, though, it’s better to have two ropes – one 80m and the other at least 60m. The 80m rope can be used for climbing, and the loose 60m for securing the descent. In our case, we hauled the loose 60m up to the A2 station and there tied its end to the ring of the station. After my partner and I reached the TOP, we tied the 80m to the 60m and rappeled to A2, pulling ourselves to the A2 station using the attached 60m rope (during the descent, at the height of A2, we were about 5-7m away from the wall and pulling back to the wall was hard!!). From A2, we descended using both ropes to the ground.


